Part of the aim of this project was to produce a bike that could give its owner a lot of fun and be a practical proposition as a ride to work machine. You see, we reckon in today’s financial climate there are a lot more enthusiasts who have to work to a tight budget and won’t be able to justify several machines, that’s why the enduro style machine was chosen. It allows its owner – me at the moment – to do enduros and MX as well as ride in to work. This last task was hampered a little by no lights being fitted at the moment but after a glorious early March weekend and a weather forecast that promised another day of sunshine plus lighting up time of nearly 6pm the 18 mile trip into work was tackled…
I should really have known, after all, I’m nearly 52 and have been caught out sooo many times by the forecast saying one thing and the weather deciding to do something else. The trip in to CDB HQ was in that hazy cloud that could easily turn into sunshine but doesn’t. In fact it got worse as the day went on and I really should have left the office earlier than I did…
Enjoy more Classic Dirt Bike Magazine reading.
Click here to subscribe & save.
 However, the spirited road ride – though well within all speed limits officer – highlighted a few fine-tuning points such as wheel balancing and the carburation. While the engine was away being checked over by Richard Nixon at the Can-Am Clinic I got a chance to check the carburettor over and replace a jet or two from the spares box, and when the engine came back with a clean bill of health and was back in the frame I found I’d got the carburation close – but not quite – spot on. There’s a little hesitation from tickover, not much but enough to warrant an hour or so of fine tuning at the weekend.
Problem is, getting the carburettor off is a task and a half. Convinced I was doing it wrong as I seemed to have half the bike apart, I took advice from better people – Jeff Smith, a name not unknown in the Can-Am world. “It’s not a 10 second task,” he said, proving his dry Lancastrian wit hasn’t been lost since moving to the USA some years ago, “and not one I’d like to tackle in the field,” he added.
Stripping down
Throughout the rebuild of this Can-Am there’s been no real need to do much, if any, tidying up on the cycle parts. Okay, we did the wheels because they needed to be done and that’s not the sort of thing to do twice, but the chassis and cycle parts were left as is until everything was working right.
Once that happy stage had been reached, more or less, it was time to think about doing some prettying up as it’s getting close to the time of giving it away in a competition. Right at the outset of the project the final colour scheme was thrown open to the floor, so to speak, and suggestions were invited as to what colour we should paint the thing.
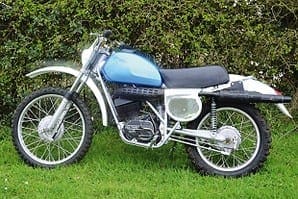
 The suggestions that came in ranged from T ‘n’ T colours, to Can-Am orange and military green, even a faction that felt it ought to be left as it was. However, the editor managed to find a picture of a similar era – mid 1970s – KTM in an attractive silver chassis and lightish blue and put this forward as an option. The two designers on CDB at the time – the artistic Holly and Sarah – also liked this scheme and it eventually came out tops in the poll. It was a close run thing at one time between this and Can-Am orange, but blue and silver it now is.
Looking round the trade stalls at Wrighty’s show, my eye was caught by the rainbow coloured Yamaha frame on the Redditch Shotblasting stand. There’s a fantastic range of colours available and silver was one of them, actually silver was several of them as there were loads of shades. Paul and Dave who run Redditch Shotblasting were happy to provide a nice silver coating on the green and rust Can-Am so, one quiet night a flask of coffee was made and the editor decamped to the workshop, stripped the Can-Am again and piled the frame and cycle parts in the car for the trip to the midlands.
A bit messy
Coating the frame and other bits is a relatively pain-free process but the petrol tank was another matter. As it was being refinished locally, a word with the lad going to do it brought the response “Is it coated in the darned awful – he didn’t say ‘darned’ but this is a family magazine – military green paint?” “Yes, it is actually Duncan… why?” “It’s radar, infra red, bullet and stealth proof and paint won’t stick to it so best thing is to get some paint stripper on to it mate and get it off.” He went on to say that a respray of an ex-RAF Dodge pick-up some years earlier – also coated in this stealth paint – went from a couple of afternoons with some wet and dry, to a fortnight of hard graft.
So, quietly one evening after tea, a piece of scrap board was placed on the workshop bench, petrol drained from the tank, any loose bits of paint scraped off and a blob of paint stripper dropped on… 10 minutes later, not a sign of any wrinkling of the paint… 20 minutes… 30 minutes… an hour… nothing… de nada… zilch… nowt… hmmm.
Ever heard of the phrase ‘as boring as watching paint dry’? Well that’s got loads of excitement over watching paint stripper work on something that possibly could be paint-stripper proof. In the end I poured almost a full litre container of the gloopy liquid over the tank and left it overnight. Next morning, overalls on, I made my way to the workshop, opened the door and oh, joy! The top layer of paint had lifted… only three more to go…
 On any motorcycle that’s 30 or more years old there’s a good chance that the plasticware is going to be a little second-hand and, in this case, army green. Serviceable enough but not a match for the new colour scheme.
Luckily Sammy Doble at MD Racing has an excellent selection of classic and vintage plastic among the brand new gear. A quick phone call to the South West and a suggestion or two from the experts there had new guards and headlamp cowl heading to CDB. Once the powder is on the frame, the tank painted and the bike assembled with the new plastics we can do the final stage – wiring it up for lights. This will be the subject of a stand alone feature and will be quick detach for when we’re MXing rather than enduro-ing. ![]()