At one end of the Classic Dirt Bike office there is Racer Boy who goes quickly, very quickly actually, in modern bike racing and a little closer to the CDB desk is Hill Climb Bloke, who looks like he’s going to be a champion at the end of the season. With me so far? Good. The figures they bandy about for costs frightened a careful northerner like me, suddenly this idea got started, is motorcycle sport too expensive and excluding a lot of people?
We reckon there are a lot more people who have to watch their budget carefully than there are those with a barrow load of cash to spend, so we applied a little thought, did some checking and reckoned we could get to the start line of an enduro, yes and the finish, for a grand – or a thousand pounds.
Enjoy more Classic Dirt Bike Magazine reading.
Click here to subscribe & save.
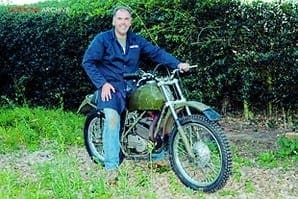
It’s a runner! Yes, that happy moment when everything came together and the pile of parts became a working motorcycle, able to be used in an event, happened at 5.23pm, Sunday, September 11, 2011. A weekend of work got all the bits together and working, it even started first kick, a proud moment in any project.
 I’m not going to say the rebuild was straightforward, as it wasn’t, despite being the one who took it apart and taking loads of photographs along the way, there were a few dead ends, retracing steps and the like. We’ll also admit that this is the preliminary rebuild, to see if everything works, so it’s not pretty but there may be modifications to do and we don’t want to damage any paintwork.
This is the sort of thing anyone who has ever rebuilt a bike will be familiar with. It’s difficult enough when the machine in question is one you’re used to working on but when it’s new to you, the potential for getting it wrong is quite high. An example of this was the throttle cable. As the Rotax engine is on autolube and I’ve been advised to keep it that way by those familiar with it, the cable is a three part item. Part one goes from the twistgrip to a junction box, then parts two and three go to the throttle slide and the oil pump. All well and good so far… right up until I came to fit it and found that I didn’t have quite enough room to lift the top off the carburettor thanks to the exhaust pipe, so off it came. A shame as I’d spent ages threading it through the frame tubes and mounting the rubber bushes but it had to be done.
There was a second exhaust incident too, but only the silencer was involved this time. In order to get the Can-Am mobile for the Classic MotorCycle Show the seized dampers were refitted as ‘struts’ and I left them in place during the assembly. When it became time for the new spangly NJBs to go on, the silencer was in the way. Or at least it was much easier to fit the left-hand side one with the silencer out of the way, bike rebuilding is fun…
The process
With the bike up on a lift, the engine unit was slotted in. It is possible to do this on your own but when the time comes to fit it after the prettying stage I’ll ask for volunteers to be on hand as the frame was clunked a time or two during the process. Once the unit is in place there are three fixing points to line up. The rear one is the biggie as it involves the swinging arm spindle going through the back of the engine. This bit caused major problems during the strip down as it was seized solid. On the assembly I used loads of copper based assembly paste, it still took a bit of lining up though with bits of wood and persuasion with a rubber mallet.
Once in, the lower engine mount slipped in easily, then came out again to slip in the alloy distance pieces… yes, we’ve all done it. The front mounts are two small engine plates bolted to the frame and then the engine. Keeping them slack allowed the four bolts and one stud to slip in easily, then a quick check all round to make sure everything was in place before tightening the nuts up.
Once this stage was arrived at, it was just a case of adding parts, things went relatively quickly and the bike started to take shape. There were minor obstacles to overcome such as the front mudguard mount. The guard fits under the bottom yoke by being bolted to tapped holes and there are some smart alloy bobbins to keep the distance correct. Three of the tapped holes are M6, the other is M8. Why? Because the Army wanted a steering damper fitted and this was the way one end was mounted. The steering damper is being abandoned and one of the alloy bobbins was opened out to accept an M8 bolt. It goes against the grain to have two different sizes like that. In an ideal world I would have helicoiled the hole back to M6 but that would have bumped the cost up a little. This method works and if I want to save a bit of weight, then I’ll drill out the length of the bolt.
The plastics on thi s bike were originally deemed unusable but after a good going over with Sdoc 100 cleaner, then Sdoc Back to Black the difference was remarkable and they will remain with the bike. What will go eventually are the mudguards and side panels as they’re well faded, Nato green and have Army markings on them. Other colours are available and white is looking favourite at the moment. But the final colour scheme is in the hands of you, dear readers, let us know what you think. Options are traditional Nato green, Can-Am’s TNT scheme – black frame, white tank and plastics with 1970s decals – bright orange like the Can-Am Qualifier, or the one favoured by our designers Holly and Sarah – a KTMesque silver frame, blue tank and white plastics.
Anyway, the project is together, running and the rest of the bits will be fitted quickly as missing are the footrests, sump plate, snail cams and enduro tyres.
By the time you’re reading this, the first event will have taken place – Vinduro in Northumberland – and the bike will have been seen at Stafford show. So, let us know what you think. ![]()