In part one of our Can-Am rebuild project we unveiled our project bike (actually, it was unveiled at Wrighty’s show in Telford but the wider audience saw it in Issue 19), a 250cc Rotax engined Can-Am built for the British Army. Opinion ranged from “you’ve a task on your hands” to “you’re bl**dy mad”.
Once back at CDB’s HQ, and having a chance to inspect it, I was inclined to agree with the latter opinion. Just to remind you, the idea was to buy, rebuild and use an enduro bike for under a grand – £1000 if you’re outside the UK – then give it away as a reader prize in a competition.
Enjoy more Classic Dirt Bike Magazine reading.
Click here to subscribe & save.
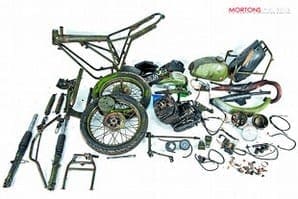
Part one of this sordid affair finished with the front end being quietly dropped out of the bike after the whole lot had several good dousings with light oil. This is a stage that shouldn’t be scrimped on as easing oil, even in large quantities, is a whole load cheaper than replacing parts broken during a stripdown because they were still seized. Even so, I probably over did it but most of the bike came apart surprisingly easily. Most. There was a big headache with the swinging arm spindle being stuck in the back of the engine.
 In case you didn’t know, the Rotax/Can-Am/Bombardier motor is held, at the rear, by a large lug on the engine that goes between the swinging arm. The whole lot clamps up tight to the frame. It makes for a rigid assembly, but unless it had lots of grease on when it was put together, or has had regular servicing, the spindle can lock tight. As the cases are magnesium there was a reluctance on my part to play the blow torch near them. I know it tends only to be magnesium swarf that ignites, but I’d only just finished the shed…
In the end, a 2lb club hammer and careful work got the spindle out and the frame rapidly became bare. The only other sticky bit was one of the rubber exhaust mounts – the hexagon was rounded, the part was scrap, so out came the vice grips.
Once it was all apart the cleaning could begin. Luckily biodegradable degreaser comes in 25 litre containers because a lot was needed as I don’t think the bike had ever been cleaned since it left the factory. Once degreased and rinsed I gave everything a good scrub with hot soapy water and more rinsing until I felt I could inspect the parts to see what was missing, beyond repair or okay for future use.
Close inspection
With the bike in bits, clean and spread out everything could be checked over and either saved or discarded. Starting from the front, the wheel bearings were beyond saving as were the head stock ones. The fork oil seals were okay for the time being and, probably most surprising of all, the chrome on the stanchions was good too – okay, there was a bit of rust at the top but where the seals run was fine. Checking the frame showed a bit of surface rust here and there but apart from a bullet shaped dent in the damper mount on one side, it was okay and will, for the time being, be rubbed down and painted.
The swinging arm too had a bit of surface rust but the bushes were good. The back wheel bearings were even worse than the front ones – which could at least turn if not spin. The rear ones were solid. One of each set was cleaned up to take the bearing numbers off and new ones will be ordered. Also seized were the original rear dampers, which will have to be replaced. Also to be replaced is the petrol tank as I’ve never seen a more rusted one still in one piece.
At first I thought the plastics were going to be too far gone for use but thanks to Dan Sagar at Fab Biker who suggested we try the Sdoc 100 plastic refurbishing system, they’re good to go. Bits missing from the bike include brake shoes, decent lights, a sprocket and chain plus sundry fasteners. Luckily the Classic MotorCycle Show at Stafford was on the horizon and a chance to buy some fasteners for the bars at least.
As this magazine i s quarterly a lot can happen as it’s being put together and there were a couple of offers of help and parts following publication of last issue. Pete Hillidge sent along a sprocket and a set of brake shoes and added he might have a few other bits. A new pair of Renthal bars came our way and Paul at Military Can-Am sorted some new head bearings, other brake shoes, a swinging arm spindle to replace the destroyed one. Chris Marsh, who sourced the bike in the first place, provided a spare set of wheels, a petrol tank and a kick-start so there’s a chance to build the bike up to a rolling chassis.
Working method
Right from the start there was a plan with this bike. The plan involved saving money where we could and spending where we should. It also involved a dry build with all the repair work being done, a bit of paint slapped on so we weren’t damaging a pristine finish by finding a bit of welding was needed. That said there will be things that will need to be concours at the start – tings like the wheels, as we don’t want to fit new rims to the grubby hubs then have to strip them out again and rebuild them later.
The Can-Am hubs are an interesting set-up as the main body is aluminium alloy but each has a steel flange fitted to hold the spokes at one side. On the project bike, an ex-military machine, the whole lot was covered in Nato Green and I’d seen polished hubs that looked so smart, I felt that was the way to go. But in order to polish them up the steel flanges needed removing. Getting the front flange off wasn’t a problem as it’s only held on by five M6 csk screws but the rear one is a shrink fit and it proved more difficult. However, off it came and I was happily going to polish away at the hubs, brake plates and fork yokes until Nick at The AcquaBlast Center said: “Come try our vapour blasting…”
 So, I popped along to his unit up near the A1 and came away with satin finished alloy parts. This finish is perfect for what we want on this project, it will look good without constant polishing, just the thing for a dirt bike. Once the flanges are back on the hubs we’ll have them away and rims fitted. But, before all that, the frame has to be attended to and initial thoughts of dispensing with the autolube oil tank were dismissed under advice from columnist Jeff Smith and enthusiast Chris Marsh. Both said a version of the same thing, the autolube system, works best.
Unfortunately the top tune oil tank has a foam filter in it which breaks down and has to be fished out. Former Kawasaki works racer, TT winner and now arch trials enthusiast Mick Grant lives not far away, though the amount of times I’ve been there with Can-Am bits he’s probably planning on moving and not leaving a forwarding address. He said: “The best thing is cut an inspection hatch in the tube, fish out the muck then you know it’s right.” So, we did and even though I was expecting a lot of crud in there I still got a shock. Next stage was to mix up a concentrated de-rusting solution and fill the tube with it. It was so concentrated that the rust almost jumped off and now, with the hatch welded up, I’m happy to put oil in there, certain that no crud will reach the engine internals.
A little bit of gentle assembly is next on the cards as we need to make sure all the fasteners fit, brackets exist and everything is straight. As the engine is a structural part of the chassis though, it will make sense to check it out first. ![]()